


Why You Should be Leveraging Nmap for Network Endpoint Security

We have all been there. We are at a new place with new devices and the previous person did not keep good records. Now we’re being asked to secure the network without losing current functionality. Allow the good devices and block the bad, or at least put the bad on the guest network. So, what are all the devices on the network?
Some of the devices will be easy to identify and others not so much. An invaluable free tool to help you get started is Nmap (https://nmap.org/) . This tool helps you do a quick scan of your network to help find out how much you know and how much you don’t know.
How Nmap Enables Endpoint Visibility
You can run Nmap from the shell prompt, among the myriad of other command line options, but an easier way to get started is to use the Zenmap tool that has a UI to help you navigate your initial discovery.
One helpful feature of both the Nmap command line tool and Zenmap is the ability to output the results as XML. This output then allows you to use additional data parsing techniques to dig further into your data and look for patterns that can help you identify various devices with some detective work.
Nmap does a great job at identifying certain devices, but it’s not a comprehensive resource for all IoT devices in the market. Most of the time, you can identify the laptops, servers, and networking devices in your network, but not the mass of IoT devices people carry around or use in modern offices. TVs, projectors, lightbulbs, phones, and other harder to identify devices need to be properly identified especially as you strive to not interrupt business as usual.
Getting Started With Nmap
Let’s work through a small example on how to use the results from Nmap to help identify groups of devices on your network to help you determine network security rules for applications like your Network Access Control (NAC) software.
First, we will install Zenmap to help us through our process. The latest instructions can be found here: https://nmap.org/zenmap/
Running a Scan on Your Network
After installation, we select to run an intense scan on a subnet of our network. In this case the 192.168.1.X part of our network by specifying the proper CIDR notation.

The UI shows you the resulting command line from your profile selection should you choose to use the command line in future scripts. Look here for formatting your output to your desired format. For this example, we will be using the -oX option from Zenmap which allows us to look at and search the XML.
Examining Your Scan Results
Running this scan on a network you have access to might yield a typical IoT set of results.
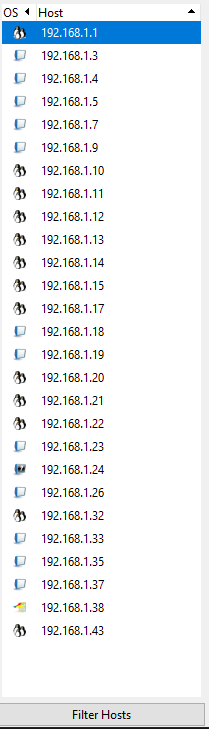
Scan Results (Enlarge)
As you can see there are many devices that are identified as Linux OS and unknown OS. Also, there is the easily identified Windows OS which is one of the laptops on the network, and many MacOS devices which include the Macbooks, iPhones, Apple watches, and other devices that attach to the network.
Classifying Unknown IoT Devices
Since many IoT devices use a base Linux OS, let’s see if we can find a pattern to help classify a larger subset of these unknown devices.
By selecting a device from our list, we can find some good details about what the device might be. Selecting the “Port/Hosts” and “Host Details” tabs we get some insightful data into the identity of this device.
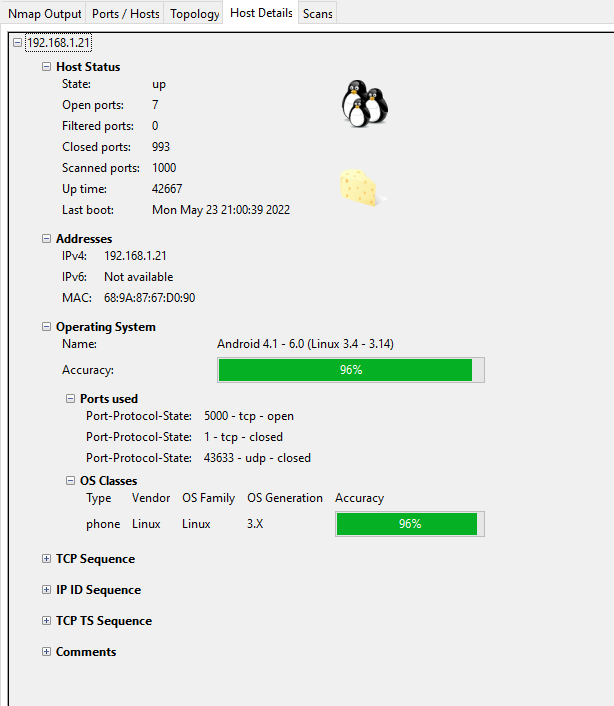
Host Details (Enlarge)
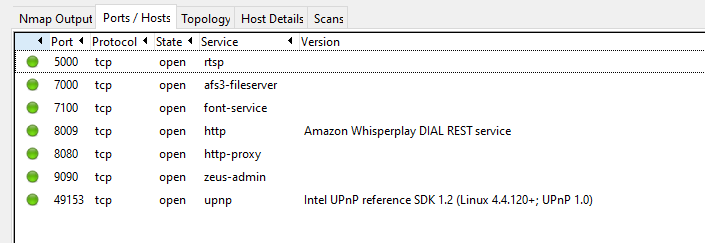
Ports/Hosts (Enlarge)
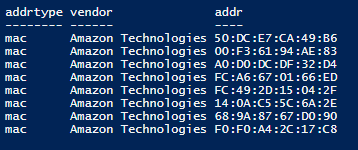
Already we see that one of the ports is associated with Amazon devices. There is one more hint in the XML output which can be obtained from the menu selection Scan -> Save Scan and opening the XML in Visual Studio Code.

Here we can see that the MAC vendor (the manufacturer of the network access card) is also Amazon Technologies. MAC vendors are identifiable from the first three bytes of the MAC address and searchable from such online sources as https://standardsoui.ieee.org/oui/oui.txt
Filtering Out Devices From Results
With these hints we can start to look at our network with the lens of filtering out all Amazon devices like Alexa Echo Dots and Fire TV sticks.
A short PowerShell script run on the XML output yields the results that follow:
![]()
Or even better, you can use this script to get the IP addresses of those same devices, although you will still want the MAC addresses for NAC and other purposes.

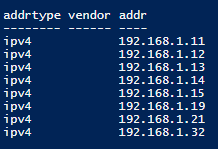
This tells us that we likely have 8 devices on our network from Amazon and I could start to scan our larger network looking for IP addresses for MAC addresses belonging to Amazon and classifying those devices. Our network is one step closer to being secure.
Use Nmap to kickstart your network detective work and get your network more secure by knowing what devices are out there.


Try Portnox Cloud for Free Today
Gain access to all of Portnox's powerful zero trust access control free capabilities for 30 days!